Thursday, December 23, 2010

Candied Pecans

I made these yummy crunchy pecans to include in a few Christmas care packages that we sent to friends and family.  They are good on their own or you can throw them on some ice cream or a nice salad.  Best part is, they were soooo easy!

Ingredients
1 egg white
1 or 2 teaspoons ground cinnamon (to taste)
1/2 cup white sugar
1/2 cup brown sugar
3/4 teaspoon salt
1 tbsp vanilla extract
1 pound pecan halves

Directions
Preheat oven to 250 degrees F (120 degrees C). Line a baking sheet with foil and lightly butter or spray with a non-stick spray
In a bowl, beat the egg white until foamy. Mix in cinnamon, sugars, salt, and vanilla extract. Mix well. Stir in pecan halves, stirring until well coated. Spread on baking sheet.
Bake in preheated oven for 1 hour, stirring every 15 minutes.

To make a pretty gift out of the pecans, fill up any size mason jar, top with a circle of fabric and screw the lid on.  Add a bow to finish it off!


Wednesday, December 22, 2010

Christmas Round Here

Our house is modestly decorated for Christmas this year because we are moving to Wisconsin NEXT MONTH!  This is our first Christmas together as a married couple, but we didn't go all out and get a big tree just for the fact that we will have to come back from Christmas vacation to tear it all down AND pack the whole place up to move.  Packing is bad enough, and we didn't want to be vacuuming up pine needles on top of that.  So we just went with my trusty old 3 foot tree that I've had since college.  I threw some garland up and carefully placed lots of pretty shiny things to make it feel like Christmas.  Here's what we ended up with...

Remember my autumn candle arrangement?  I switched it up by adding all things red, silver, and glittery to make it all Christmas-like.
Then I added my most favorite red and silver mercury glass trees to my wine bar area.  Up on the top shelf is a simple candle nativity - the reason for the season!
Here's our tiny little tree next to our TV high tech fireplace.  Oh, apartment living!
Some garland on the bar - nothin' too fancy.
And finally some new additions to the ornament collection this year.
1.  The most perfect ornament ever made - a blown glass mixer  :)
2.  A cute polar bear from World Market
3.  Sledding snowman
4.  Our first Married Christmas wedding cake ornament :)


So that's Christmas in our Florida apartment.  Who knows, next Christmas I may be posting about Christmas in our new house!  :)

Friday, December 17, 2010

Snowflake Sugar Cookies


Just made these today...


These guys were actually cut with a flower cookie cutter, then I piped the icing on in a snowflake pattern.  Throw in a few silver dragees and you've got a sparkly snowflake cookie!  The icing is a vanilla glace.  It dries shiny and stays fairly soft (unlike royal icing), but it still able to be stacked without the cookies sticking to each other.  Here is the recipe for the glace icing:

1lb powdered sugar (4 C)
6T whole milk
6T light Corn Syrup
1 t extract (I use vanilla)

With a whisk, combine sugar and milk until smooth. Then stir in corn syrup and extract and desired food coloring.

You can play around with the consistency by adding more milk or powdered sugar.  Adding more powdered sugar will give you a consistency that is better for piping.  Place your icing in an icing squeeze bottle like this.  Outline the shape of the cookie by squeeing a line of icing out of the squeeze bottle around the outside border of your cookie..  Then, fill in the rest of the cookie with more icing and spread out easily to cover the whole cookie.  You can spread the icing with a knife, offset spatula, or the back of a spoon. 

These were fun to make and some friends that we had over tonight didn't want to eat them because they said they looked too good.  I'll count that as success!  :)

Wednesday, December 15, 2010

Peanut Butter Buckeyes

I first had these little gems a few years ago at a a friend's house.  This friend was from Ohio where this dessert is all the rage.  After all, Ohio is the buckeye state and home of the Ohio State Buckeyes.  You'd think being a Florida Gator I would have nothing to do with anything buckeye related, but these treats are just too hard to pass up!  They are pretty simple to make and the only cooking involved is some button pushing on a microwave.  Here is the recipe!

Ingredients
1 1/2 cups creamy peanut butter
1/2 cup butter, softened
1 teaspoon vanilla extract
4 cups sifted confectioners' sugar
6 ounces semi-sweet chocolate chips
2 tablespoons shortening

Directions
Line a baking sheet with waxed paper; set aside.
In a medium bowl, mix peanut butter, butter, vanilla, and confectioners' sugar with hands to form a smooth stiff dough. Shape into balls using 2 teaspoons of dough for each ball. Place on prepared pan, and refrigerate.
Melt shortening and chocolate together in a metal bowl over a pan of lightly simmering water. Stir occasionally until smooth, and remove from heat.
Remove balls from refrigerator. Insert a wooden toothpick into a ball, and dip into melted chocolate. Return to wax paper, chocolate side down, and remove toothpick. Repeat with remaining balls. Refrigerate for 30 minutes to set.


Tuesday, December 14, 2010

Photoshop Fun

I recently put this profile pic up on facebook...


Not bad.  It was actually taken from our video camera.  The camera has a cool feature that recognizes smiles in the midst of a video and saves a snapshot of your pearly whites.  On this day I was strolling through Central Park on our honeymoon in NYC.   Now you know why I'm so happy!  I liked the pic except for the guy in the background walking his dog, so I decided to photoshop him out!  After much lassoing, cloning, and blending this is what I got.  Bye-bye skinny guy!


Then I spruced the pic up a bit to give it a more ethereal look and here's my finished product...


Me likey!

Saturday, December 11, 2010

Butter and Jam Thumbprint Cookies

Christmas cookie season is in full swing!  This week I made three different cookies, all of which I will share on this here blog.  First up, some jam thumbprint cookies that I found on the Food Network's website.  They are basically a sugar cookie with any flavor of jam in the middle.  I used strawberry this first go-round, and in the future I think I might try raspberry, apricot, or even lemon. I think I will be adding these to my yearly cookie making list because they are great!  The sugar coating on the outside and jam in the middle makes them mighty sweet, so have a big ol' glass of milk handy!   Here we go....

Ingredients
1 3/4 cups all-purpose flour
1/2 teaspoon baking powder
1/2 teaspoon fine salt
3/4 cup unsalted butter (1 1/2 sticks), softened
2/3 cup sugar, plus more for rolling
1 large egg
1/2 vanilla bean, seeds scraped from pod, or 1/8 teaspoon vanilla bean paste or 1 teaspoon pure vanilla extract
1/3 cup raspberry, cherry or strawberry jam

Directions
Preheat oven to 350 degrees F. Line 2 baking sheets with parchment paper or silicone mats.
Whisk the flour, baking powder and salt together in a bowl.

In another bowl, whip the butter and the sugar with a hand-held mixer until fluffy, about 5 minutes. Beat in the egg and vanilla until just combined. Slowly beat in the dry ingredients in 2 additions, mixing just until incorporated.

Scoop the dough into 1-inch balls with a cookie or ice cream scoop and roll in sugar. Place about 2-inches apart on the prepared baking sheets. Press a thumbprint into the center of each ball, about 1/2-inch deep. Fill each indentation with about 3/4 teaspoon jam.

Bake cookies until the edges are golden, about 15 minutes. (For even color, rotate the pans from top to bottom about halfway through baking.) Cool cookies on the baking sheets. Serve.
Store cookies in a tightly sealed container for up to 5 days.


Saturday, December 4, 2010

Christmas Cookie Tool Roundup

It's about time to get started on some Christmas cookies!  Before I get to baking, I thought I'd share some of my favorite cookie-making tools.  Sure you could make cookies without them, but after using them you'll never want to go back!

Let's start with the first step, mixing, and my first favorite tool - the mixer!
If you don't have a mixer, get one!  I don't care if it's a hand held mixer, you won't regret it.  I started out with a handheld mixer, and was SOOO glad when I got it.  Before that, I did everything by hand, including whipped cream and whipped chocolate ganache icing.  Um yeah, ganache takes FOREVER to whip!  Sure, there's some satisfaction and bragging rights with saying "Look at me! I hand whipped this chocolate for hours!", but you will be so tired that you won't even have the energy to lift your yummy creation to your mouth to eat it.  Your arm will be jello for days afterward! So get a mixer, dad-gummit!
I am now the lucky owner of a KitchenAid mixer thanks to my wedding registry.  :)  They are expensive (around $300 buckaroos), but they should last a lifetime.   They were first introduced in 1919, that's almost 100 years of a proven track record.  I love their retro appearance too.  Here's my little baby.  I've had her for almost a year and she's gotten a TON of use already...including cookies.


My next cookie tool is a cookie scoop
This is basically a miniaturized ice cream scoop with a mechanical "cookie dough-getter-offer" feature.  No more using a spoon and trying to get the dough off with your sticky, doughy fingers.  Plus, this helps you to make round, equally sized cookies every time.  So purdy!

Moving on, we have the thin spatula
These guys glide under your finished cookies with ease, and with minimal damage.  If you use a spatula that is too thick, your cookie shape will be distorted as you are trying to lift it off of the pan.  Go with one of these thin spatulas to ensure that your cookies stay looking pretty as a picture.

Take it from someone who has a small apartment kitchen - these things are awesome!  The racks stack on top of each other and take up minimal counter space. In addition any crumbs that fall from the cookies will fall onto a smaller area instead of all over your entire counter space. I use these for cooling and storing un-iced cakes too.  Love Love Love!!!

Now that I've got all of my supplies, I'm ready to get to baking.  First Christmas cookie will be some Jam Thumbprints for our Bible study group this Friday.  I'll share the recipe soon!

Friday, November 12, 2010

Wedding Cake Delivery

What's the most nerve wracking thing you could do?  Why, deliver a wedding cake, of course!
Here's why...
You spend HOURS making this cake perfect (about 16 for this one)
Someone else has paid you to do it
That someone else is having their big day you don't want to be the one to ruin it
After all the work spent to get it perfect, you have to drive it in your car.  Wha-huh????  Are you crazy???

I was SOOO nervous about delivering this cake that I had trouble sleeping the night before.  This was an all buttercream cake, and takes a bit of touching up after you stack it to make the buttercream look perfect.  So I decided to deliver the cake stacked, because I didn't want to mess with stacking it at the venue.  Better to get it perfect at home when I have the time and when no one is watching me!   I stacked it at home the night before and threw it in the fridge to firm up for delivery in the morning.

I'm happy to report that the delivery went smoothly!  A piece of cake (pun intended)!  I carried the cake down my apartment stairs (yeah, that was fun), then placed the cake in the back of my SUV on a non-skid mat and the thing didn't budge.  Not even a wiggle or a wobble!  The trip was a half hour and I didn't go over 40 mph.  When I got there I was SOOOO happy and relieved!   All I had to do at the venue was add the flowers and it was done!  WHEW!  Here's a little pictorial of my adventure...

Here she is all ready for her trip...


 Gotta have the signs!

 Nervous!  Here I go!

Done!  Success!  :)

Wednesday, November 10, 2010

My First Wedding Cake!

About a month ago I got a facebook message from my friend Erinn who I know from my old church.  She asked if I could make her wedding cake and I of course said YES!  I've been wanting to make a wedding cake, and jumped at the opportunity.  We met up, decided on a design and flavors.  She had an autumn wedding with green, orange, brown, and gold as her decor colors.  This was the inspiration cake that she found on the internet.  She wanted something similar, except done in buttercream instead of fondant.

traditional wedding cakes

This was my first time doing a three tier cake and for the most part it went smoothly.  The only glitch was when I tried to re-position the second tier after I had stacked it.  Yeah, I won't be trying that again!  It caused to cake to lean a little, so I had to do a little fixing to get it straight.  But in the end it turned out ok.  :)  This cake was 10", 8", and 6" and could feed up to 50 peeps.  She had 25 at her wedding, so I'm sure there were lots left over!  It is iced in buttercream and decorated with fondant pearls, piped buttercream swirls, handmade gold gumpaste leaves, and fresh flowers.

Here are a few shots of the finished product...


This was so fun to make and I definitely learned a lot!  This was also my first time delivering a cake this big and I was SOOOOOO nervous!  I'll write about that and how I did it in another entry.  Until then, thanks for looking!

Thursday, November 4, 2010

I need a new food!

Every so often I stumble across a new food that makes me think "How did I ever live without this all my life?!".  Then I proceed to try and get it any which way I can.  I've done the following with lots of food...
First it was calamata olives, then salmon, then lentils, goat cheese, polenta, hummus, guacamole, roasted red peppers, roasted tomatoes, thai red curry, jasmine rice, indian masala.  YUM YUM YUM!


Well, it's been a while since I've found my new "it food" and I need a new one, pronto!  What about you?  What are some of your favorite food finds?  It could be an amazing dish or a lone ingredient.   Come on, help a Stace out!

Monday, November 1, 2010

Focaccia Bread

I saw this recipe from ButterYum's blog and just had to try it!  It's a recipe from Food Network chef Anne Burrell and it's sooo easy.  I made it to go along with some stuffed shells that I planned on making for Sunday dinner.  You can cut it into breadsticks for dipping in pasta sauce, or in larger squares which you can slice in half to make a sandwich.

Here goes!...

Ingredients
1 3/4 cups warm water
1 package active dry yeast
1 tablespoon sugar
5 cups all-purpose flour, plus additional for kneading
1 tablespoon kosher salt, plus coarse sea salt, for sprinkling
1 cup extra-virgin olive oil, divided

Directions
Combine the warm water, yeast and sugar in a small bowl. Put the bowl in a warm, not hot or cool, place until the yeast is bubbling and aromatic, at least 15 minutes.

In the bowl of a mixer fitted with a dough hook, combine the flour, 1 tablespoon of kosher salt, 1/2 cup olive oil and the yeast mixture on low speed. Once the dough has come together, continue to knead for 5 to 6 minutes on a medium speed until it becomes smooth and soft. Give it a sprinkle of flour if the dough is really sticky and tacky.

Transfer the dough to a clean, lightly floured surface, then knead it by hand 1 or 2 times. Again, give it another sprinkle of flour if the dough is really sticky and tacky.

Coat the inside of the mixer bowl lightly with olive oil and return the dough to the bowl. Cover it with plastic wrap and put it in a warm place until the dough has doubled in size, at least 1 hour.

Coat a jelly roll pan with the remaining 1/2 cup olive oil. (Chef's Note: This may seem excessive, but focaccia is an oily crusted bread. This is why it is soooooooooo delicious!).

Put the dough onto the jelly roll pan and begin pressing it out to fit the size of the pan. Turn the dough over to coat the other side with the olive oil. Continue to stretch the dough to fit the pan. As you are doing so, spread your fingers out and make finger holes all the way through the dough. (Chef's Note: Yes, this is strange. But when the dough rises again it will create the characteristic craggy looking focaccia. If you do not make the actual holes in the dough, the finished product will be very smooth.)

Put the dough in the warm place until it has doubled in size, about 1 hour. While the dough is rising a second time, preheat the oven to 425 degrees F.

Liberally sprinkle the top of the focaccia with some coarse sea salt and lightly drizzle a little oil on top. Bake the dough until the top of the loaf is golden brown, about 25 to 30 minutes. Remove the focaccia from the oven and let it cool before cutting and serving.

Here's my dough in the pan, risen a second time and ready to go into the oven.  Stuffed Shells waiting in the wings

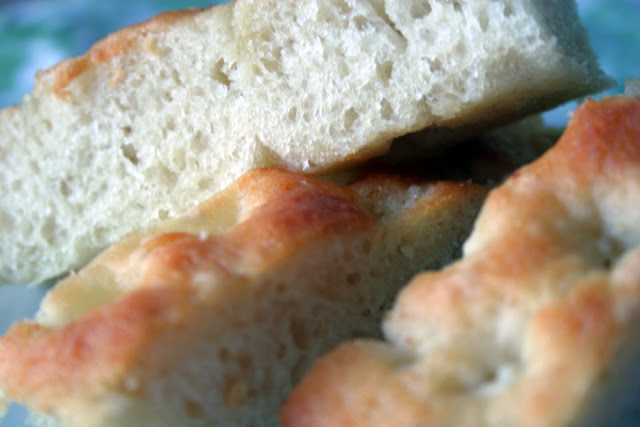
And the final result.  Yummy!  :)


Sunday, October 24, 2010

Spray paint makes it better

I've got a plethora of glass hurricane candle holders.  Short, tall, crackled, clear...but some have silver metal on them and some have black.  It's kinda hard to explain, so here's a couple of pictures

See?  I wanted to use the hurricanes to make an autumn themed centerpiece for our table, but was not happy with the fact that they weren't matching.  The solution?

SPRAYPAINT!

I took the black metal and gave it a good spray, then headed to Michael's to get some candles, pinecones, and berry spray thingers.  Spent about 12 bucks total.  Here's the finished product.


Better, no?

Friday, October 22, 2010

Chocolate Crinkle Cookies

These are so yummy!  Like a cross between a brownie and a cookie.  Could you ask for more?  Maybe just a glass of milk.  :)  I followed the recipe except I had to smoosh my cookies into disks instead of balls because my initial batch of cookie balls didn't flatten out.  After I smooshed them, the cooked up great!  Here's the recipe...


Ingredients:

4 tablespoons (56 grams) unsalted butter
8 ounces (225 grams) semisweet or bittersweet chocolate, coarsely chopped
1/2 cup (100 grams) granulated white sugar
2 large eggs
2 teaspoons pure vanilla extract
1 1/2 cups (195 grams) all-purpose flour
1/4 teaspoon salt
1/2 teaspoon baking powder

Topping:
1 cup (110 grams) confectioners (powdered or icing) sugar, sifted

Directions:

In a stainless steel bowl, placed over a saucepan of simmering water, melt the chocolate and butter. Remove from heat and set aside.
In the bowl of your electric mixer (or with a hand mixer), beat the eggs and sugar until thick, pale, and fluffy. (When you slowly raise the beaters the batter will fall back into the bowl in slow ribbons.) At this point beat in the vanilla extract and then stir in the melted chocolate mixture.

In a separate bowl whisk together the flour, salt, and baking powder. Add dry ingredients to the chocolate mixture, stirring just until incorporated. Cover with plastic wrap and refrigerate until firm enough to shape into balls (3-4 hours or overnight).

Preheat oven to 350 degrees F (170 degrees C) and place rack in center of oven. Line two baking sheets with parchment paper.

Place the confectioners sugar in a shallow bowl. With lightly greased hands, roll a small amount of chilled dough to form a 1 inch (2.5 cm) ball. Place the ball of dough into the confectioners sugar and roll the ball in the sugar until it is completely coated and no chocolate shows through. Gently lift the sugar-covered ball, tapping off excess sugar, and place on prepared baking sheet. Continue forming cookies, spacing about 2 inches (5 cm) apart on baking sheets. (If you find the dough getting too soft for rolling into balls, return to the refrigerator and let chill until firm.)

Bake cookies for 8 to 10 minutes or just until the edges are slightly firm but the centers are still soft. (For moist chewy cookies do not over bake. Over baking these cookies will cause them to be dry.) Remove from oven and place on a wire rack to cool.

Yum!


Sunday, October 17, 2010

Perfect Cheesecake

I love this cheesecake!  It's nice and creamy, and just perfectly firm.  It's delicious on its own or top it with whatever you like to kick it up a notch.  I chose cherries because that's the hub's favorite!  Definitely use a springform pan for this one, preferrably one with an 8" diameter.  That will ensure that you get a nice, tall cheesecake that looks like it came from a restaurant.  Here's the recipe!

1 cup finely ground graham crackers (one sleeve of crackers run through the food processor should work)
3 tablespoons unsalted butter, melted
3 tablespoons sugar
1 1/2 cups sugar
32 ounces cream cheese, room temperature
Pinch of salt
1 teaspoon pure vanilla extract
4 large eggs, room temperature
Boiling water, for roasting pan

Directions

1.  Preheat oven to 350 degrees. Wrap exterior of a 8-inch springform pan (including base) in a triple layer of foil; set aside.
2.  Stir together cracker crumbs, melted butter, and 3 tablespoons sugar in a medium bowl. Press crumb mixture firmly onto bottom of pan and up the sides. Bake until set, about 10 minutes. Let cool in pan on a wire rack. Reduce oven temperature to 325 degrees.
3.  Put cream cheese in the bowl of an electric mixer fitted with the paddle attachment; mix on medium speed until fluffy, about 3 minutes. With mixer on low speed, add remaining 1 1/2 cups sugar in a slow, steady stream. Add salt and vanilla; mix until well combined. Add eggs, one at a time, mixing each until just combined (do not overmix). Pour cream cheese filling over crust.
4.  Set cake pan inside a large, shallow roasting pan. Transfer to oven. Carefully ladle boiling water into roasting pan to reach halfway up sides of cake pan. Bake until cake is set but slightly wobbly in the center, 60 to 70 minutes.  Then turn the oven off and leave the cheesecake in for another 30 minutes.
5.  Transfer cake pan to rack; let cake cool completely. Refrigerate, uncovered, 6 hours or overnight. Before unmolding, run a knife around edge of cake.

Here's the finished cheesecake!
Notice the crack?  Putting the boiling water in the pan around the baking cheesecake is supposed to prevent this, but it still cracked anyway.  But who cares....cherries to the rescue!
Mmmmm, much better.  :)

Saturday, October 9, 2010

Sweet Potato Pie Cookies with Orange Glaze

I don't like pumpkin.  Sorry, but I just don't.  This time of year all the seasonal food items are coming out...pumpkin lattes, pumpkin pie, pumpkin doughnuts, pumpkin bagels.  We even tried pumpkin italian ice the other night which only confirmed my disdain for pumpkin.  Ew!   My hatred of pumpkin does make me feel a little left out on the Fall food fun.  Sure, I can have hot apple cider, but that's about it.  So when I saw this recipe  on the Food Network the other day, I jumped at the opportunity to try it out.  This is a good cookie,  notably because of it's spicy flavor.  It has more of a cakey consistency and is even better the next day.

Here is the recipe:
Ingredients
2 cups all-purpose flour
1/2 teaspoon baking powder
1/2 teaspoon baking soda
2 teaspoons ground cinnamon
1/2 teaspoon ground ginger
1/2 teaspoon ground allspice
1/8 teaspoon ground nutmeg
1/2 teaspoon salt
1 stick (1/2 cup) salted butter, room temperature
1 cup granulated sugar
3/4 cup light brown sugar
1 egg, room temperature
1 teaspoon vanilla extract
1 cup sweet potato puree
1 cup chopped pecans
Orange Glaze:
1 1/2 cups confectioners' sugar
3 tablespoons freshly squeezed orange juice
1 teaspoon vanilla extract

Directions
Preheat the oven to 375 degrees F and adjust racks to the middle position. Line 2 cookie sheets with parchment paper.
In a medium bowl, sift together the flour, baking powder, baking soda, cinnamon, ginger, allspice, nutmeg, and salt.
Using a hand held mixer cream together the butter, granulated sugar and the brown sugar until light and fluffy and the volume has increased. Add the egg and the vanilla and mix until incorporated. Stir in the sweet potato puree and blend until smooth. Beat in the dry ingredients in increments and combine well. Stir in the pecans.
Drop by heaping tablespoons onto the prepared cookie sheets, leaving about 2 inches of space between each cookie. Bake until the cookies are lightly golden around the edges and they spring back from the touch, about 12 minutes. Let cool completely on the cookie sheets before glazing.

For the glaze:
Combine the confectioners' sugar, orange juice, and vanilla in a small bowl and stir until smooth. Drizzle over the cookies and let harden for 1 hour before serving.
Cook's Note: If you need to thin the glaze, add more orange juice. If you need to thicken it, add more confectioners' sugar.

And now my completed cookies are ready for their closeup!  Mmmmm!  :)